
$3 DIY Aged Wood Prop For Food Photography
This DIY Aged Wood project took 15 minutes to make and is so inexpensive you won't believe it. I was at our local lumber yard the other day purchasing some project pine with the thought of using some different techniques to age it and ultimately building a board to use as a photo prop.
As the guy helping me was pulling my boards out, I saw pieces of strapping wood off to the side. I noticed they looked old and aged already so I asked him if they were scraps.
He said not, but that basically strapping is a light, cheap wood that ages fast outside so they always have some that look this way. Lightbulb. How much? 17c a linear foot. Sounds good to me, my project pine that I was just going to beat up anyways was 57c a linear foot. I will take it.
The strapping is 1x3x10 so a whopping $1.70 for the board. He even cut it into 5 , 2ft sections for me, free. Most lumber yards will do that, ask them!
So here is what to do once you have your wood:
Additional items needed:
- 3 scrap pieces of wood
- screws
- drill
- 3 small bottles of craft paint ( you won't use it all) My Apple Barrel ones were 50¢ at Walmart! Black, Tan, Aqua Blue
- Small bowl
- Rags
- Any paint brush
If you absolutely can not find an aged piece of strapping (highly unlikely) then you CAN use a regular pine for projects and aged it by smacking it with the hammer, scuffing it up with rough sand paper and such.
One piece of strapping gave me the perfect size , width and length. It is about 24 x 15 . I sit it on top of the microwave cart I use to wheel around in front of windows to gain natural light when shooting. Anyways...
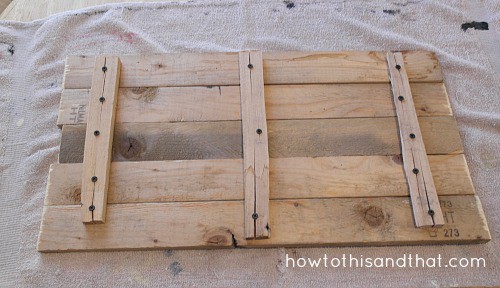
1. Line the pieces of wood up side by side, play with flipping them to get the look you like (knots, grooves)

2. Screw 3 small pieces of wood to the back side, this will hold the boards in place. We just used old scrap pieces we had around here and drywall screws (all I had left) which is why you see splitting. No biggy since this will be stationary.
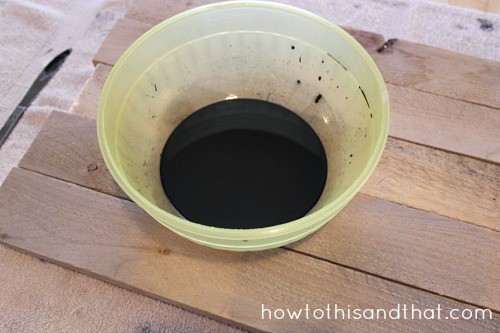
3. Mix equal parts of black paint and water into the bowl. You don't need a lot. I used one quarter sized drop of paint. Mix well. Use a rag to brush it on and wipe off the excess same as you would apply stain. Repeat with the brown paint.
4. After applying the brown, you can play with it by adding more black here and there for a more aged look or to give dimension. using paint instead of stain for a few reasons: 1. it is cheaper 2. it dries faster 3. the smell 4. the paint is more of a matte look
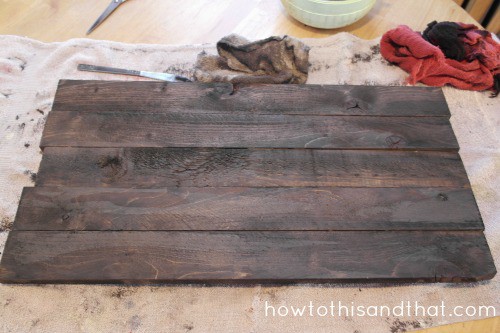
5. The aqua blue is to add a cool tone if you do not want a warm picture. I was taking pictures using a wooden cutting board that had a lot of warm tones to it and it gave a pink glow to all my shots. So, if you want a cooler aged look, mix the paint same as above and use the paint brush. Brush it on up and down here and there. I went right across all the boards. Then wipe the excess.

This was completely dry in less than 15 minutes and is working out beautifully!


Note* The purpose of this project is to be a prop. I would not recommend eating off the board, that isn't what it is made for.
Another Awesome Wood Craft DIY

Owner & Lead Recipe Developer for It's Simple! since 2015, where you will find our best Family Favorites & Keto Low Carb Dishes with Helpful Cooking Tips & Hints in each post. Many Thanks for Stopping By, Enjoy!


Great article! I have also seen where you can make a double sided "table top" by laying wood perpendicular and gluing the backs together. I am getting ready to try it with some pallets that I took apart. Thanks for the tips!
This is great! Whenever I see these distressed wooden "tables" in photos of gorgeous food, I never thought it could be a simple prop. This is definitely on my to-do list, thank you for sharing!